Saturday, December 24, 2011

Easing Into the Holidays

Well I managed to secure rental of the neighbour's garage with an agreement from the new neighbours for the next two years. That is a relief!

I am in the process of emptying the most recent load in the kiln, lots of yellow cedar and maple plus a little cherry. The yellow cedar is wonderful, the maple less so. The cherry is a shame, I started with half a dozen decent sized slabs off the log, lost a lot to air drying, then lost almost all the rest in the kiln. I'll be lucky to get a 2' long 2x6 out of it all.


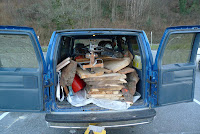
Picked up some big maple slabs that I milled last year out in New Westminster, they were on consignment with a local shop. They are refocusing their business, so they asked to unwind our little deal and so I took some of the slabs back. Anyone want any 12' long 4" thick maple slabs that are just under 2' wide? I can't even lift the cursed things!


The slow woodworker has been sidetracked by another project in the meanwhile. I have decided to digitize all of our family's pre-digital camera photos and videos. Hopefully they may be more durable digitized than in musty old photo albums that tend to get damaged or thrown out after a couple generations.  To date I have done around 5400 individual photos, slides, and videos. These things take about 2 1/2 minutes per, so for 5400, that's umm, a lot of time! 200-ish hours.

Sunday, December 18, 2011

The Dark Side of a Woodpile

Milling up my own wood is a lot of fun, especially when the weather co-operates and the slabs are beautiful and peeling off the log without problem.

While I am pretty sure my milling is economically efficient and good re-purposing of what would otherwise by ground up into wood chips, there is a lot of work involved. I'm not just talking about the work around the chainsaws; the actual milling, the maintenance of the saws, driving to and from the site, etc.

There is a ton of work associated with maintaining the woodpile too. And one of the least pleasant woodpile tasks comes around late every fall, when the weather turns cool and wet. And the rats decide that my dry and sheltered woodpile would make a great winter home. They announce their presence with rat turds everywhere. It is disgusting. I set traps as my main weapon. A week rarely goes by without catching one. One day I had four.

Apparently there are two types of rat I have caught. The typical black Norway rat which based on the size of the ones I catch seem to have no trouble finding ample food. And a slightly smaller rat that is brown in colour with a white belly. In fact their colouring reminds me a lot of my daughter's hamsters, although I have not shared this observation with her! About 10% of what I catch are this variety.


This one was on a slab up higher in the pile and when it tripped it fell off the pile, almost landed on another trap!

Tuesday, November 29, 2011

Change of Direction

A busy few weeks, although progress on the desk was naturally, slow!

After much soul searching I have decided that no matter how much love I put into my daughter's desk, no matter how much stain I put on it, the wood is still going to be crap and look like crap. The good news is that I liked the design, so I intend to re-use most of it. But my daughter is going to have to wait a while longer now!

 Original magnolia top

So I decided to switch to a different wood. As it turns out, I have several nice slabs of east Indian rosewood that I bought off ebay several years ago. According to the seller, they were from Florida and got blown down in a hurricane, maybe Andrew - I don't recall for sure. One of them will be perfect for the top. I am thinking to cut some jarrah veneers and veneer over the magnolia legs. The jarrah was salvaged from a local mansion that was torn down a few years ago.


 East Indian Rosewood top

Jarrah and more EI rosewood

I emptied the kiln of the last load, and put in a new load of misc things, with some elm, yellow cedar, cherry, and more maple.  I am most excited about the yellow cedar, I think there will be enough good material there to complete my long-delayed curved front glass cabinet that I have been wanting to do for a couple years. The cherry is mostly a disappointment, there is just so much spoilage when I dry cherry it is really disheartening.

 Currently drying away in the kiln . . .

I also had one piece of arbutus in the last load. It has only dried one summer, but the log was down for 3 or 4 years before I milled it. So I put one piece in the kiln as an experiment, and it turned out very well. Hardly any warping or cracking at all, I was very pleased. Some mineral staining on it though. I may put the rest of it in the next load, although the other pieces are closer to 3" thick and may not react as well.

 Arbutus front and centre

And the neighbour has finally sold his house. I need to be out of the garage by Feb 1. Seems like lots of time but I am sure it will go by quickly. I am trying to get in touch with the buyers to see if they are interested in renting.

And my contact at the beach who sets up logs for me  retired at the end of last week. So who knows what the future holds - maybe less milling and more woodworking! I did get down the day before he left and milled up a couple small logs, an oak and an elm.

Thursday, November 3, 2011

Desk Time

Well with the neighbour's garage mostly emptied of the best wood, and the kiln loaded and the woodpile reorganized, there was very little else to do in the shop but get down to some woodworking! Well, that and some milling as I explained in my last couple of posts.

So it was back to the desk for my daughter that I had hoped to have completed in early September. I had given some more thought to the configuration of the frame, as I was looking for a single drawer in the middle of the front of the desk. I was wrestling with how to keep it strong with a drawer right in the front, and the usual problem of how to join the skirts to the legs.

I found my solution in FWW 104, a Shaker Desk by Garret Hack, and FWW 93, a Windsor Style Table by Mac Campbell.

So I got down to work, trimmed everything to length and cut some dovetails and mortise and tenon joints. It was nice to be doing some real woodworking again finally, chopping some dovetails and using the horizontal mortiser.

Mortises mostly done

Dialing in tenons on the shaper

First  joint complete!

Tuesday, November 1, 2011

Elm Milling

I noticed that there was a bunch of elm and oak down at the beach recently. I picked out the best piece of elm, and milled it up. November 1st, the day after halloween, it was a beautiful day down at the beach. Unfortunately for me the log had some bad cracks in it, so all I took was three slabs.


I had thought that I might like some blanks to make legs out of, and I had done a reasonable job of keeping my cuts parallel to the log's pith. (so the grain is straight) Plus I had milled to 3" thick, so I could barely lift these slabs, never mind trundle them across the beach to the van, load them, then unload them, stack them, blah blah blah. So I ripped them lengthwise.

I have been making progress on the desk. Will post shortly.

Monday, October 17, 2011

First Milling of the Fall Season

 Had some friends come to visit and we did a day of milling down at the beach. It was a Saturday and a holiday weekend, with decent weather to boot.

 Logs before the millingfest


I only had one of my mills operating, but it worked very well, other than a broken chain at one point. My friend brought his Alaska mill along and we had both going for four or five hours with probably 15 or more people taking turns running the mills. I didn't do a final count, but I am guessing that we finished with close to 20 slabs. We milled 6 different logs: Two Port Orford cedar, cherry, western red cedar, elm, and catalpa.

Afterwards- the debris


 Part of what we milled up


Afterwards everyone came over to my place and helped me by taking wood from my garage! Don't think I will be doing as much milling this winter, as I have very little storage space left. It's official, the neighbour sold his house, I need to be out by early January.

Still plenty of time between now and then though, so I loaded up the kiln with probably the biggest load I have run so far! It took me the better part of two days to load this baby up!


Arbutus, maple, cherry, locust, deodar, lots of different species in there. I was smart this time and trimmed off all the knots, cracks, etc BEFORE the wood went in the kiln. It is not recommended to mix species in the kiln, as they dry (and crack) at different rates, but I have found that since I air dry them for two years first, that it seems to work OK.

Sunday, October 9, 2011

A Not Unexpected Diversion

The Slow Woodworker has been focussed on getting all of his wood moved out of the garage across the lane, since that house (and therefore the garage!) is for sale again and it looks like the owner is serious this time. I have decided to take what I want, and then offer up the rest to my woodworking buddies. Whatever is left over I will throw out to the firewood seeking neighbours.

Clearing out the garage has been a good exercise, as it has forced me to really look at what I have and what I really need. For example, do I really need 10 slabs of old growth Douglas Fir? Or 6 big catalpa slabs? No, probably one or two of each would be enough. Similarly, every time I turn around I trip over Monterey Cypress. I'll keep a couple pieces, but the rest has gots to go! Maple with a bad smell, alder with cracks, cherry with bad grain graphics, begone I say!
Probably what hurts the most is yellow cedar. I have a ton of smaller pieces of old growth yellow cedar. It just kills me to throw out a piece of wood that is hundreds of years old, if not a thousand years or more. Someone out there must be able to use them for something . . .

Meanwhile, despite my heavy heart, I have made some progress on Daughter's Desk. I just need to figure out the drawer frame and support, and then I will be ready to start cutting dovetails and mortises, etc. It sure is ugly in Magnolia, perhaps I should have been more proactive in suggesting an alternative wood to my wife and daughter. I will try to stain it so it is a bit more palatable. 

I have a couple pieces of beautifully figured London Plane (like Sycamore) that will make a nice drawer front for the desk.

Tuesday, September 27, 2011

Pedal to the Metal . . . .Soon!

The Slow Woodworker got side tracked in September and sadly not very much happened in the shop.

The motor on my 12" General jointer packed it in, which necessitated a re and re on the motor switch. And good for me for finding a replacement for a 35 year old motor switch! OK, the second hand one I found needed quite a bit of modification but I got it to work finally. This is the switch inside the motor that controls the starter windings, not the magnetic starter that you push 'start' and 'start' on. A big pain in the butt that I didn't really need, this little nuisance sucked up way too many cycles. 


Then I fell into the 'while it's apart' trap, and wound up spending the better part of the day fiddling with the jointer's motor mount that I have never been happy with. Now I am happy with the mount but annoyed I wasted another day!

Also, my son and I went on a little father/son holiday for two weeks. Bus tour of northern Italy. Great fun!

Then when I got back I discovered that my neighbour has put his house back on the market. Since I am using his garage as my secondary shop / wood storage area, this will be a problem if he sells. And he seems serious about it this time. So I have started clearing the place out. I just dump it in the lane behind my garage, some of the neighbours take it for firewood.
Perhaps I should have a 'wood yard sale' rather than just throwing it out! I am keeping as much of the better stuff as I can, but I have to be realistic about it. I have several thousand board feet in piles in the back yard too.

Once the jointer was working again I was able to finish the stock prep for the magnolia desk. Hopefully oodles of progress will follow shortly!

Tuesday, August 30, 2011

Getting Organized

Completed a much delayed little walnut shelf project earlier in the summer. I had received a bunch of air dried Oregon walnut from a neighbour a couple years ago, made this as a simple thank you. Inspired by a piece I saw in a book about the work of some of James Krenov's students. Finished with shellac, but it was all streaky. Very odd. Gave up on shellac, first time ever. Went to Tried and True varnish, worked like a charm. The colours on the air dried walnut are so much more alive than they are in kiln dried walnut. It's really quite an amazing difference, though the picture does not do it justice.


Casting about for a new project. Want to avoid the problems I've had in the past with trying to shoehorn a piece of wood into a project that it just won't work for. Not ready to take on a big display cabinet with legs - yet - although that remains my 'ultimate dream' project.

Started on a Wendy Maruyama inspired shelf out of arbutus. The hardest part for me is deciding on sizes and proportions, and figuring out if one wood works with another. Part of the learning process. Guess I am a slow learner . . .

My wife out of the blue wants me to build a desk for our daughter, a desk made from, get this, a slab! Yes! I have a garage full of slabs and this I can do! Watch for the worlds fastest slab desk to appear here at the Slow Woodworker!


Unfortunately the ladies chose this slab, which is magnolia. The wood is pretty much identical to poplar, with some rather unattractive mineral staining. I planed it to about 1 1/2 thick, cut it to 55" long, then beveled the underside with a router jig so that the edges appear about 1" thick. As you can see in the photo, it was time for the palm sander. Next up will be the legs, etc and finishing.

Monday, August 22, 2011

Summer: Going, going . . .

I had the chance in early July to spend a week at the Inside Passage School of Fine Woodworking. It was a wonderful experience, a whole week on mortise and tenon joints! More than that it was a chance to connect with some like minded woodworkers, learn some great things from the school, and recharge my woodworking batteries.

Otherwise, I've pretty much taken the summer away from the shop. Have run a couple of loads of slabs through the kiln, so now I have plenty of dry wood for this winter's projects, as well as space in the backyard for more fresh slabs! I guess I must have cut a lot of Douglas fir, as there seems to be a lot of it running through the kiln now. Not especially desirable as a cabinet wood, but this is old growth with tight growth rings. Krenov made a cabinet out of "Oregon pine" that was featured in one of his books, this is another name for Douglas fir.

Every time I load the kiln I am reminded of the physical nature of woodworking. It never ceases to amaze/frustrate me how much work it is moving these planks around. Of course they weigh more when the are freshly cut and still wet, but I can assure you that even a nearly dry Doug fir plank that is 8' long, 10/4 thick and 2' wide is a substantial stick of wood! I must be getting smarter as I get older, now I use a cart whenever I can, rather than just when I must. My back is thanking me.

In the sun, pulling boards off the stack, cutting to length, resealing the end, carrying over to the kiln and stacking. Several boards had rat feces on them (I trapped two this week), so that had to be carefully swept off and disposed of while wearing a mask. Reorganizing and tidying the stack back up afterwards. The whole business took the better part of the afternoon, probably 4 hours, and I was perspiring like mad the whole time. It's hard work plain and simple, and the pleasure of working with the wood to build something hopefully beautiful, seems a long ways off!

My kiln is only 8' long, I don't know why I have milled some of my boards a couple inches too long. Of course I have to get out the saw (skilsaw in this case) and cut off the end, then reseal it before it goes into the kiln. Pure 100% unnecessary work. Make mental note for next time I am milling . . . 8 feet MAX!!!!!

Saturday, May 14, 2011

This 'n That

My recent flurry of plane tuning while convalescing continued onto a couple other planes, a spokeshave that belonged to my grandfather, and some Japanese chisels. With all these great functional tools now lying around, it was inevitable that progress would be made on a project.

 Grampa's Spokeshave Rehabilitated

So I whipped up a simple wall shelf out of cherry and catalpa.  All the wood in it I milled up previously with my Alaska mill. The cherry about six years ago, the catalpa two or three. The back panel is a single piece of catalpa that is 13” tall and 23” wide. It was a leftover piece from a slab about 5’ long that I had cut to length for another project.


A friend resawed the catalpa on his 20” Crescent bandsaw with a Laguna blade. It was unbelievable, smooth enough to use without any sanding. My Minimax was choking on it, I need to do some work on the chip clearance. Wall hangers I made up myself from brass. The back is attached with loose screws and enough space to allow for seasonal movement.

 Resawing Catalpa on Crescent Bandsaw

One bad oops occurred when I drilled some holes in the catalpa in the wrong spot. They were for screws and supposed to line up with the backs of the shelves but did not! Luckily I had the foresight to cut up a couple spare back pieces when I was over at my friend's place.


The cherry was all planed, or for the ornery bits, scraped. I then rubbed it with the shavings and ran some steel wool over it. Edges were softened with a block plane and a strip of 600 grit sandpaper. Finish is a couple coats of padded on shellac with beeswax on top.
Now I can put my Hammond Glider accessories on the shelf and they will be “away”, I no longer have to constantly move them around my shop to get them “out of the way”!

Meanwhile, I had a bunch of burls lying around that got the better of me and I wound up slicing them all up, in the hopes that they would dry faster / more evenly in smaller pieces. Maple and walnut. Don't have much experience with burl so this is a bit of an experiment.

Spalted Maple Burl

I also scored three small firewood sized logs of holly from the yard of a demolished house in the neighbourhood. I have had trouble getting holly to stay white while it dries, so I sliced these up on the bandsaw right away and threw them in the kiln at full blast. I had hoped that this would prevent blue stain, but it did not seem to yield any real improvement.

Looks like my three dead 2100 chainsaws are going to come back from the dead, three new pistons and two replated cylinders later. If all of these come together I will own 8 high powered chainsaws. Three or four will be out the door in short order to help recoup some costs.

I also milled up another yellow cedar chunk down at the beach. Brutal embedded sand in the cracks. Went for 3+" thick slabs. Then I could not move them to my van so I wound up splitting them along the crack. The chainsawing area is now closed till the fall. Seems my rib has healed up enough to get back to the milling, just in time for the milling area to close until the fall. Sigh.

Tuesday, April 12, 2011

Plane Repairs

I have several wooden planes that I've been wanted to close the mouths up a bit on, so with sore ribs preventing me from doing anything very physical, it seemed like a good time to get to work on a couple of these.

(The ribs were initially diagnosed as bruised, but that was upgraded to 'cracked' after my second visit to the doctor. I lost an edge playing hockey and slid into the boards hard.)

Anyways, first up was a cocobolo Krenov style plane with a 1 1/4" blade that I wanted to put a cocobolo insert in, which I did by routing out the bottom in front of the mouth.

When it came to flatten the bottom, I decided to try something a bit different. I had taken a course on metal scraping in Seattle a couple of years ago from  a guy named Forrest Addy. Hand scraping a metal surface will yield a surface flatter than can be achieved by machining or by abrasion/sanding. I had had great success in scraping an old Stanley plane at that time, and thought I would see how the process would work on a wood plane.

 Scraping pattern on bottom of Stanley plane

I modified the procedure only slightly for wood, by using my very thin hand scraper (from Lee Valley I believe). With a granite reference surface, a tube of Prussian Blue oil paint, and a Brayer roller, I was off to the races.

I started scraping immediately after I had passed the bottom of the plane over the jointer, and as a result half the work was to get past the jointer ripples. Note to self: Next time sand off the ripples after jointing!

The process was to roll the dye out on the granite, put the plane down on top of the granite surface (which will mark the high spots with the dye), and then scrape, using the smallest strokes possible ( 1/16"?), all the dye spots off the bottom. Then repeat, until you get a consistent pattern of dye marks across the entire bottom. It took me about ten passes to get to where I wanted it to be.

After a couple scrapings

Getting near the end, fairly even pattern just not dense enough yet.

After the bottom was flat, I very carefully worked the mouth with small files until I achieved a tiny opening. This was rather tedious, but the plane yields full length full width shavings consistently now. I'd judge the procedure a success!


Next was an old beech coffin smoothing plane that I picked up a few years ago. It has good 'bones' and a great heavy old laminated 2" blade on it. I had glued a new sole of quartersawn locust to it some time ago, now was the time to finish the job.

I chose locust for the sole since it is the hardest wood available locally. In retrospect it was not the best choice as it is quite brittle and filing the mouth was too delicate as a result.


This one really taxed my plane tuning skills. The blade angle had become far too steep over the years, so I had to regrind and resharpen. The laminated steel was extremely tough going. The chipbreaker was warped and not closing tightly. The wedge was not holding the blade in evenly. And the new sole was not flat so I tried to flatten it with the same scraping procedure, but unfortunately the blue dye got into the pores of the locust and made lit hard to figure out where to scrape. After an awful lot more fooling around than I had wanted/hoped/expected, I started getting full length full width shavings .0005" thick.


 Time to put these bad boys to work!


Sunday, April 3, 2011

More More Milling

It seems like what little time I have had recently for "woodworking stuff" has been dedicated to milling. Unfortunately my pile is now completely full, I have wood leaning against the garage and no place to stack it, and now I have injured myself playing hockey!

After picking up the yellow cedar a couple weeks ago, I went back to get some more of it, only to discover that a bunch of deodar logs had arrived. So I spent a morning milling up deodar. I have milled up deodar before, I love the smell.


Unfortunately, this log had a lot of knots in it, not nearly as much clear wood as I had hoped for, although still enough to make it worthwhile. I wound up with 9 slabs, and even left a couple of the worst ones on the beach, first time I had ever done that!

Started to have some mill problems as well, the mill seemed to be diving into the log at the start of the cut, making it super hard to push for the first six inches or so. Diagnosed some lose nuts on the mill, hopefully that will take care of it!

The week after that I went back to get some more of the yellow cedar. Unfortunately it started to rain pretty hard so I decided to save it for another day. Not before I noticed a couple more promising pieces of deodar though.

Then I planned to go back and get the deodar and the yellow cedar, except I hurt myself playing hockey and it looks like the milling is done for a while now. That's what happens when 50 year old guys play hockey I guess. At least as soon as I can plane without pain I can get back to the shop!

Thursday, March 17, 2011

More Milling

Had a couple more milling sessions recently.

Some friends joined me one brisk morning for a maple crotch, an enormous and ancient red cedar stump/burl, and a short piece of maple with quilting in it. Unfortunately this day went badly and ended early, as both maples were punky/rotten/blue stained, and the cedar was too deeply fissured to yield anything decent.


Subsequently I went back and took a look at a large piece of yellow cedar that had obviously been cut down ages ago, eventually drifted ashore locally, and had lain on the beach for several months.  After a minor string of bad luck with rotten logs recently, I was a bit reluctant to go at it since it struck me as being kind of marginal. Twisted, cracked, weathered, full of sand, etc. Despite this, it contained some very promising looking sections.

While the log was indeed full of sand and incredibly tough on my chain, I wound up getting five nice slabs from it, all quarter sawn or rift sawn. While there are some cracks, I have no doubt that I will still have a lot of very fine material once it all dries.


Sometimes it does pay to take a chance!

Sunday, March 6, 2011

Some BIG Milling

Scored this big maple log last week. 9' long, 3 1/2' wide at the narrow end. Probably the widest log I have ever attempted.


Unfortunately it was totally punky, my friend and I did not get anything from it. Which was a shame as there was some beautiful quilting in some areas.

But it was a darn fun day!

We did pick up a few pieces of cherry though. 3' across, but only about 2' long, with the graft union in them, it was a flowering cherry.


The new saw was cutting well, we used the 5' bar.

Saturday, February 26, 2011

Back in the Milling Saddle!


It has been an eventful couple of week since the loss of the 2100s. As mentioned, I picked up a pair of 3120s and a pair of 390s in Victoria, along with a trove of spare parts.

I am on the trail of some new cylinders and pistons for the 2100, if I can get them repaired, I will wind up with seven big chainsaws. 

I took the 3120s into the shop on Monday for tune ups as they had not been run in 2+ years. I was in kind of a rush as I had a long standing plan with my friend Pete who lives in the Okanagan to do some milling on Thur/Fri at the beach.

I picked one of them up on Wed afternoon, the other needed some oiler parts. At the same time I dropped off the 390s for their going-over. 

The bad luck started immediately thereafter when I tried to mount the 3120 to my homebrew mill which had previous been driven by the 2100. Turns out the 3120 is bigger than the 2100, and interfered with one of the threaded rods which was threaded into a hole in the bar. So a long story, and a long cold dark evening, but I had to redrill and rethread a new hole in the bar, I lost about 1 1/2" of cut width, and then I had to change the mill itself since the threaded rods it mounts on were now closer together.

So on the chilly Thursday morning we selected a couple short pieces of horse chestnut and an elm crotch to work on. The chainsaw gods were continuing to conspire against me though. The saw  troubles started immediately and I did not put saw to wood until about 1 o’clock.  This included a 3120 problem, problems with my last functioning 2100, and eventually a desperate run to the shop to fix the 3120. Luckily it was an easy fix and I was also able to pick up one of the 390s which was now ready. I eventually got the 390 into action and started milling up the horse chestnut, wound up taking ten slabs 2 ½” thick off the two logs. My buddy was working away on the elm.

Two small horse chestnut logs
Elm crotch

Friday morning we started in on a log that was covered in burls. It might be maple, but we are not sure. Again, a lot of planning and set up required to get the best cuts, but I eventually started taking off slabs. Soon the oiler adjustment screw fell out of the 390 and it wouldn’t oil any more. So I switched back to the 3120. That was the end of my saw troubles, but now it was time for my mill to act up. Turns out the last minute mods I made to accommodate the threaded rods being moved closer together were a bit weak and allowed the mill to flex, causing it to dive and jam in the wood. My buddy's saw refused to start for most of the day on Friday as well. Finally by Friday afternoon we had two saws in action, all the log set up and trimming was done, and we were able to make some good progress.

 Burly Mystery log

At the end of the day on Friday, in addition to the ten shortish horse chestnut slabs, we drove away with ten 10’ elm slabs at about 1 ¼” thick, and eight 10’ maple? burl slabs, plus a bunch of burls and shorter pieces of the elm.

My share of the loot

I went home, showered, had dinner, then slept for 11 hours! Can’t wait till next time!

 End of the day, beach in the shade, the 'banks' of Spanish Banks visible. 
Tough place to work!

Friday, February 18, 2011

Husky 2100 - RIP

It seems that my recent milling marathon in New Westminster described in my last post was tough on more than just my lower back. Both of my Husky 2100 saws that I used on that adventure have been pronounced DOA at the mechanic's shop.

They told me that the saws were starved for oil in the mix, and that I have damaged the pistons and the cylinders by running too lean. New pistons can be purchased for these old-timers, but new cylinder heads cannot. So I am done.

I checked the 2 stroke oil the shop had recommended I use. It came with a convenient measure for 1 US gallon / 4.5 litres. Unfortunately the measure was 100:1!!  So no wonder. I can't understand why the manufacturer would recommend 100:1, and why the chainsaw shop would suggest that brand to me. I also can't understand why I didn't read the fine print on the oil containers more carefully!

Luckily, I hit the jackpot. A guy I know from a chainsaw milling forum that I participate in turned me on to a fellow in Victoria who was selling four older (not as old as mine though) Husky saws, two 3120's that are larger than the 2100, and two 390's that are slightly smaller. Plus he had a couple 'parts saws', and a ton of accessories, including bars, chain, mufflers, air filters, etc. In fact he was a very nice retired logger who had done a lot of milling at the end of his logging career. They have seen some use, but looked to be in good shape, better than my old saws were. A quick day trip to sunny Victoria via ferry and I came home with my car loaded with the loot.I'll go through it over the next week.

 Coming Out of Active Pass, Vancouver in Distance

In other news, I pulled a load of wood out of my kiln this week. Pictured is a piece of 'fiddleback catalpa' that was in there. Who knew that catalpa had fiddleback? Who even knew there was catalpa?! This chainsaw milling gig sure turns up some quirky stuff!

In the bad news department, my neighbour whose garage I use for woody activities has listed his house for sale. It appears the luxury of a second shop is nearly done, and I will shortly have to make some tough decisions on what to keep and what to move along.