Friday, April 29, 2016

Cedar Chest

My wife discovered some moths in her sweaters and an emergency was instantly declared. A cedar chest was decreed.

All hands on deck for a cedar chest! All other projects are thrust to the backburner for the time being!

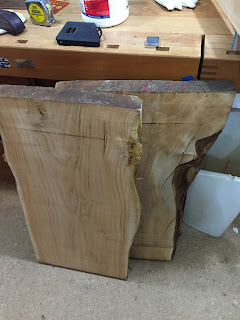
Fortunately I had several slabs of fairly wide Monterey cypress that would let me build the chest of wide planks.  The first step was to run them through the planer on a sled to flatten one side.

Once that was done I selected the best ones, and marked them for cutting to rough dimensions. I'm planning 12" x 16" x 36". Since my table saw is too small to cut boards of these dimensions, I used a skilsaw.

Following that, the 12" wide boards were resawn on my bandsaw.

I wound up with 5 boards, plus a couple other pieces I can press into service if things really go sideways!

However since my bandsaw's throat capacity is only 13", I could not resaw the top and bottom pieces which are to be 16" wide. So I had to bust out my Alaska mill and resaw them that way.

The Alaska mill is a bit coarse, so I left the boards oversized so they can be trimmed to thickness on my planer.

It actually went pretty well. The top will be the Monterey cypress and the bottom will be Deodar cedar, very aromatic.

I'll let the boards acclimatize for a few days, then run them through the planer and then trim close to final dimensions. I am thinking finger joints.

One issue is going to be taming the sap in these boards. Previously I have set the sap in Monterey cypress by baking the boards in the oven, but these are too big for that. Maybe one end at a time?! Need to come up with something creative here.


Wednesday, March 30, 2016

A Little Non-Wood Diversion

Last year I was fortunate enough to acquire a car that I had long aspired to, an early 90's Lancia Delta. I have quickly learned that spare parts are going to be an ongoing problem.

A small plastic cap that was supposed to cover the rear window's wiper shaft / wiper arm connection cracked and fell off recently and thus I began my Quixotic quest to locate a new one of these. It is actually a purely decorative part, as the car works fine without it, and it is worth in my estimate about 17 cents. Not available from the usual (European) Lancia suppliers, I took to eBay and some less well known folks, and discovered it was in fact available. Prices ranged from about 17 euros to 40 euros, plus shipping of course.

Well these egregious prices really annoyed me, so I decided to instead 3D print a replacement.  I have never done 3D printing so this was to be a learning exercise as well as a process to get a usable part.

My son is attending university and has access to and is familiar with CAD software as part of one of his engineering courses, so he was to be my partner in crime on this. Without him helping me it is doubtful I would be able to get this done. I have no desire to learn CAD software myself, and paying someone to do it, or having a 3D scan of it made seemed totally uneconomical.

So after measuring up the original somewhat carefully with my calipers, I sent him the dimensions, he CAD'ed it up and subsequently sent me back a drawing.


After a couple back and forths it was good to go. I located a nearby 3D printer and $9 later I had my first prototype.

Original on left and first prototype on right

No surprise the fit was not quite right, so a bit more measuring and back and forthing we had a second drawing ready to print. The printer was also very helpful and provided some suggestions for improvement. However, for the second prototype they also increased their price to $13 for some unknown reason.
From Left: Original (now falling apart again), first prototype, second prototype


The second prototype is not quite right, but we are getting closer. Hopefully the next version will be on the money. Otherwise the exercise will turn out to have cost more than what I could have paid for one of the egregiously priced parts from Europe! In that case I may have to print off a few spares and attempt to undercut the European suppliers by offering them up on eBay etc.


Sunday, March 13, 2016

Plane Bottoms

I have a variety of planes, and which one I use for a particular task depends mostly on the material to be worked. The type/hardness/grain of material, how wide it is, how long it is, what quality of finish is needed, and so on. I have several planes in different sizes that I have made myself, following the designs of James Krenov. I also have a couple styles of asian planes, antique Stanley planes in multiple sizes, a modern low angle plane, curved bottom planes, block planes, etc.

Probably my top 3 go-to planes are a Veritas low angle smoother, a Stanley/Bailey #3, and a Krenov-sytle smoother.


The Veritas and the Stanley are easy to set for a consistent thickness shaving, but both are a pain to sharpen. The Veritas because the blade is wide and made of a particularly hard steel, the Stanley because the blade is thin (although it is a thicker replacement blade) and tends to rock on the stone if I am not careful. Frankly both of these sharpen better with a jig. The Krenov-style plane is very fussy to setup, but when done so correctly offers the thinest shavings, And it is much easier to sharpen.

Anyways since we all know you can never have too many planes, I thought it would be fun to try an English smoothing plane. So I picked up an old Norris from Patrick Leach, author of the famous plane treatise "Patrick's Blood and Gore".

Although it is a bit shorter than the other planes, it is also has a 2 1/4" wide blade. Versus the 1 3/4" blade on the Stanley. It is also heavier by far than any of the other planes

Patrick claimed the Norris was a 'decent user' when he sold it to me, and it was as he described. The opening was tight, the blade had lots of life in it still, there were no cracks in the plane anywhere. It was well patinated, in fact it look like it had rolled around in a tool kit for a long time and was covered in tiny dents! But they were just superficial. A quick sharpening had it spitting out shavings, but the adjustment mechanism was pretty stiff, and it was apparent that the bottom of the plane was not flat.

So I decided to work on the flatness by scraping it with a carbide scraping tool, an old-school technique I learned 10+ years ago at a seminar down in Seattle. Most people (myself included) will use a piece of sandpaper on a flat surface, like a jointer's outfeed table, to flatten the bottom of a plane. This technique is fine, but scraping will provide a far more uniformly flat surface, to within a fraction of a thousanth of an inch.

In fact, the Stanley/Bailey was my first experiment in scraping, It was in really bad shape initially, so I took it with me to that scraping class just for a lark, and had good success in making in extremely flat.
Bottom of the Stanley plane's scrape marks

So I hoped to replicate that success on the Norris. In a nutshell, the process involves rolling out ink to a very thin layer on a granite surface plate, then setting down the plane on the surface plate. When the plane is lifted up, all the high spots will have ink on them and the low spots will not. Then, using a carbide tipped tool, all the inked spots are scraped off. The process is repeated as many times as required to get the surface flat. Since scraping only removes a tiny bit of material, it could take 50 or more passes to get the surface properly flat.

Here is the Norris part way through the process. I think the ink on the surface plate was too thick, it should have been more like a series of spots than a continuous area.

I worked on scraping it over two days and lost count of the number of passes I took. Because it is quite messy I was doing it outside. It finally started to rain on the second day so I had to call it done. It definitely cuts better than it did before being scraped, but is still not what I hoped. I think I need to give the blade a proper sharpening, and loosen up the adjustment mechanism before I pass judgment on it.


Saturday, March 5, 2016

Boxes Round 2 - The One Day Box Challenge

After the middling success of my finger jointed boxes, I still had a bunch of dimensioned material lying around suitable for a couple of larger boxes. So I decided to abandon the finger jointed technique, and instead challenged myself to use whatever technique I wanted, but to take no more than one day to do each box.

Aaaaand we're off on the One Day Box Challenge!

First up was some beech, I had three pieces about 10" long each. I decided to use the Golden Ratio to set the dimensions of the box, so I cut one piece in half for 5", and then trimmed the other two pieces to about 8". I decided to use an overlapping butt joint, similar to some boxes I had built last Christmas.

After gluing them up (OK that was overnight) I decided the butt joint was not durable enough, so I wound up pinning the corners. For that I used bamboo skewers. It turns out though that bamboo skewers' diameters are wildly inconsistent, so I drove them through a series of smaller and smaller holes in a drill gage, until I got them to where I wanted.


I tried the same trick on some ebony, thinking that contrasting pins would be cool, but it was impossible to keep the ebony 'dowel' straight especially as the diameter got smaller.

I routed a groove on the insides of the pieces for the bottom to fit into. Amazingly, I had a piece of catalpa kicking around that was almost the perfect size for the bottom.

So once the pins were glued in place, I sanded the sides of the box down to make the pins' surface match the box surface perfectly.

The next box was similar, but was of plum with a spalted elm bottom. I decided to have the joints stick out a bit in a kind of salute to the Craftsman style of yore.


Anyways I think they turned out alright. My wife was impressed enough with this recent flurry of boxes that she asked me to make her a jewelry box.


I have also done some work on the cherry table, will show more on it next time.

Friday, February 19, 2016

Finger Jointed Boxes - Round 1?

Finished off a group of finger jointed boxes. Plan was to bang out some quick and dirty small boxes using some scrap lying around the shop. Unfortunately even these quick things take forever here at the slow woodworker! Only got five done, was hoping for more like ten.

left to right- olive/Monterey cypress, Garry oak, olive/maple, alder/Monterey cypress, myrtle/cherry

I learned that my technique for cutting the finger joints on my sliding table saw was not precise enough. I think the work holding method I was using was part of the problem, but also I think that the sliding tablesaw has a bit of play in it too. I need to give some thought to this problem before I make any more boxes, especially any with taller sides where the problem is worse.

I also learned that the myrtle, despite having an exciting tiger stripe figure, was not really that attractive a colour.


I knew going in that some of the boxes were not going to have the right proportions, and I wanted to experiment with them. I think the issue turned out to be more about the thickness of the material rather than the actual dimensions of the box.

Only the myrtle box has a recessed bottom, all the others are just glued on. The glued on bottom worked best when the bottom material matched the sides. The olive box with the glued on maple bottom is an especially bad combination. Also worried about the longevity of the glues on bottoms, if they will split over time.

The Monterey cypress has given me problems in the past with sap coming out. So I tried to set the sap using high heat in a toaster oven. That has worked for me in the past.

It's funny how no matter what the project is, the lesson is always the same. Don't take shortcuts, you won't be happy in the long term!

Monday, January 18, 2016

Cherry Table Progress, etc.

Got the last of my home made planes dialed in. Well, almost dialed in! Still a tweak or two to go but happy with the progress.

Also did a big clean up and re-org of the garage where I store a lot of my slabs. It was so full that even though I had several slabs dried and just sitting in the kiln for several months, I could not unload them since there was absolutely no place to put them.

These are some really wide elm slabs that I was able to pull out of the kiln finally. I had milled them width wise rather than length wise, to preserve the width. The largest one is over 3' wide. Unfortunately they are all a bit ripply, something I have not seen before and I think is due to the way I milled them. Will probably have to cut them in half anyways, so the last time I will do that kind of cutting!

Finger jointed boxes are a fun way to spend a bit of time now and again, gives me a bit of a break with a simple project that yields quick results. Also a great way to use up small pieces of special wood.

Here is some maple burl I cut up and will use for the boxes.

The first box I made, out of a piece of figured myrtle my son and I picked up some years ago driving up the coast of Oregon/California. I discovered some errors on this one so just cut the fingers off and did it again.

These boxes are of French Olive. A local somehow got hold of me a few years ago and asked if they could have some arbutus for a woodworking friend in France. I gave them a couple pieces and in return they brought home a chunk of olive. It was pretty crack riddled, but I was able to cut some pieces out of it for these boxes. Also one box is from Garry oak a buddy gave me from Vancouver Island. 

I wound up having to cut up another cherry slab for use in the base of the cherry table. I decided I wanted a couple of the pieces to be a bit larger than I was able to get from first few slabs I had cut up. I will be able to get a couple of nice 2x4" boards from these. And there is enough material that I can rip them to get rid of the grain run out, and they will wind up being mostly rift sawn so the grain will be similar on all four faces.
I will have to let these sit for a while to acclimatize before taking them down to final dimension.

Meanwhile I am ready to start on the crazy Japanese joint for the bottom piece.

Thursday, January 14, 2016

Easing Into 2016

Well I got one more of my planes dialed in. Still one last one to go for 2015 - I guess it is easy to get distracted here at the Slow Woodworker!

Still no milling to report. No logs showing up at the log dump. Talked to my contact at the city and he has no idea what is up.

No progress to report on the bentwood box either, other than to note that the crooked knife I have is apparently the wrong size. Later in 2016 for that project I guess.

Meanwhile I cut up several of my thicker cherry slabs to make pieces for the base of the cherry table I want to do.

Thanks to my Mini-Max bandsaw (one of the few modern tools I own) after not too much time the slabs looked like this.

In fact I had to cut up three slabs to get this many pieces, and I have one more slab for 'just in case'. Those cherry slabs have a lot of cracks coming in from the edges so there is a lot of waste. Good thing I know someone with a BBQ smoker who loves cherry wood scraps!

I want to make the base look something like this example that I found on the internet a few years ago. I have it filed under 'Clark', so thank you Mr or Ms Clark for the idea.

You can see the longest piece of the base is the one lying on the ground. It's almost as long as the top. Unfortunately my longest piece of thick cherry I want to use for the base is not long enough for the slabs I will be using for the top. What to do? Yes, that's right! Use a blind stubbed, housed, rabbetted, oblique scarf joint to join two pieces together to make a longer piece, how did you know that?

So I did a test using a couple pieces of slightly smaller cherry I had. Of course it did not go so well, it was too gappy, but at least I know what I did wrong so I should be good for the real one.

Anyway the start of the year seemed like a good time to head down a random rathole on another project. Finger jointed boxes it is! I was cruising the woodgears.ca site and admiring the crazy nice box joint fixture he made up and thought it would be a fun project. Then I realized I have a Hammond Glider sliding tablesaw that I have converted to Imperial units so I can precisely dial in increments of 1/256" or less than .004". Phht, who needs a box joint fixture when you have a tablesaw like that! And I have lots of small pieces of scrap that are perfect for small boxes.

I made up several small boxes, still working on getting the proportions to look good though. And as bonus I found this piece of scarp that looked like a fish skeleton on my table at one point!