Saturday, July 24, 2010

Hammond Glider Teardown Finished

After the arbor I focused on getting the motor off. Conceptually it was easy, since the motor was bolted to threaded holes in the motor plate and all the bolts were easily accessible.

Practically though, the motor is extremely heavy, covered in a thick coating of lead dust, and mounted to the underside of the motor plate. Thus it would be all too easy to have the motor come crashing to the floor while removing it, sending up a cloud of toxic dust while also damaging it.

So I first bagged the motor up in a couple plastic bags in an attempt to contain any dust.


Then I clamped the motor's "feet" to the motor plate so it wouldn't fall as I took the bolts out. Finally I made a simple ramp from the saw to my van out of a couple pieces of plywood. I dropped the motor onto the plywood and pushed it into the van.

Once the motor was off and in the van, I turned my attention to the main table casting. It is held on by three large machine bolts. These provided only token resistance and were easily removed with a humongous Allen key.


The table was shimmed at the factory under these three bolts, so it was critical to not dislodge or lose track of any shims as the table was removed. Further, the shims needed to be marked so that they could be reassembled in the same position.


 I slid the table onto the same plywood ramp I used for the motor, then pushed it into the van.


Lastly was the base itself. Although I could not lift it, I was able to tilt and slide it into the van on my own.

I then disassembled the smaller assemblies which I had not done at the start, mainly the arbor and the clamp. With everything apart, it's off to the media blasting shop next!

Wednesday, July 21, 2010

Hammond Glider Teardown

The Hammond is a super high quality heavyweight small sized sliding tablesaw originally designed for cutting lead type in the printing industry of yore. Its small footprint, heavy duty construction and precision make it a desirable saw for crosscutting. It is a "cult" saw in some ways, popular among the old woodworking machines crowd.

The superguru on Hammond Gliders is Crazy Pete. He runs his own forum on them, although there is a ton of info on OWWM too.

(This is not mine, but shows what they look like)

I acquired one of uncertain age (40's? 50's?) that is complete but filthy with lead and dust, and so needs a teardown followed by media blasting and repainting. A new motor is also very likely, as are some minor modifications to allow it to take a standard sized tablesaw blade.

(This is not mine, but shows how the Hammonds work)

After taking off as many of the smaller items as I could, the sliding portion of the tabletop was the first big item I tackled. The table slides on linear ball bearings, one race of 7 bearings in a carriage on each side of the sliding portion of the table. By the end of the day my first mishap had occurred.

I finally figured out how to pull the sliding table completely off, and as I did so the rather large ball bearings dropped out neatly into a well placed cardboard box. "Oh I am so clever" thought I. The last one missed, rolled out the garage, down the driveway, and was making a getaway towards the (sloped) alley. I quickly put the table down on the box and went after the little rascal. As I did I heard a crash, the table fell off the box, knocking the box over, I turned around to see the other 13 bearings rolling out of the box down the driveway and making their escape. Eventually I rounded up 13 of the 14. I'm hoping that'll still work OK, if not I will probably have to buy 14 new ones as I would expect the old ones would have worn slightly.

( Sliding table off, just resting on top)

Next was the arbor. A couple of spanner nuts proved obstinate, requiring the purchase and modification of a special (hard to find but luckily inexpensive!) tool to remove them. This was after a couple of drill bits were sacrificed in a vain effort to get the first spanner nut out.


Penetrating oil was applied generously and left to soak overnight before success was ultimately achieved. The two spanner nuts and the pulley were removed. The arbor assembly was then removed from the saw.  I'll take the assmebly into a shop to get the bearings pressed out. They will be replaced.


Notice the very thin shim that was under the arbor assembly. Factory installed to ensure that the blade is perfectly square to the table. 


Next up, taking off the beast of a motor, removal of the main table casting, and off to the media blasting shop.

Thursday, July 15, 2010

Looking Waaaay Ahead

I have been poking around in the wood inventory looking for some stock for my next  cabinet project.

I have decided that it will be a curved front veneered showcase cabinet with old growth yellow cedar on the insides and a couple shelves. No drawers.

The difficulty/fun now is to find just the right material to use for the outside.

The original cabinet that inspired me to do this one used teak, and it worked very well with the yellow cedar interior. Since it will be a showcase cabinet, the door will be glass, so the interior will be visible from outside. Thus it is important that the two woods be harmonious together.

I have some teak, but probably not enough to do this piece. Besides, I have already done a couple cabinets with teak, so I'm kind of sick of it.

I do want a wood that is darker than the cedar though. So it won't be maple or arbutus on the outside on this one - too light. Also fairly straight grained, but not straight-jacket straight. It needs to work with the straight grain of the yellow cedar, but be a bit different!

Considering some of the possibilities that I might have enough of.

Koa. I have several lovely pieces of koa that I purchased in Hawaii a few years ago. Some have some pretty gorgeous figure in them, but most of them have somewhat wild grain and are going to be extra nasty to work with. Koa is tough enough to work at the best of times. The colour would be a great match with the cedar though. And there are some gentle curves that would be perfect for the curved top and bottom pieces. A possibility.


Cherry. I have a crapload of cherry that I harvested myself. I think I can pull together enough to make this piece. Most of it has quite a pink tinge to it though, not sure about pink with the yellow cedar. I have some paler cherry, plenty enough for this piece, but the paler urban cherry has a lot of dark patches in it I'd need to work around. Cherry will definitely darken and mellow over time.

Maccasar ebony.  I am lucky enough to have some of this.  Its dark colour might be too much of a contrast with the cedar, but I think it could work.

Yew. This intrigues me, I have enough for this piece and I harvested it myself. It is air dried, salmon coloured, and a joy to plane. Unfortunately it warps like crazy. However, something more light brown-y and less orange-y is probably a better choice.


And so it goes. And it is fun to go through the stacks of wood and think about what would work in the cabinet I have in my mind's eye. Red cedar? New Guinea walnut? Brazilian walnut? Jarrah? English brown oak?  Planchonia? Cocobolo? Claro walnut? Spalted maple? Catalpa? Elm? Red oak? Alder? Some bought, some harvested, some traded/gifted.

Keep digging through the pile, turning over planks, setting them aside, going back to them, putting some back, taking out others for consideration.

While this is going on, I have actually started the Hammond Glider disassembly.

Monday, July 5, 2010

More Small Stuff


I met up with Bob from Australia a few weeks ago. He is one of the most knowledgeable chainsaw millers in the world, with an amazing home brew mill that he is always tweaking. Being from Western Australia, he mills up some crazy woods! He was passing through town, so we met up for dinner one evening. Although we weren't able to do any milling, he did go down and take a look at the place where I do most of my milling. He took some pictures and posted them on an Australian site. Although he made a few small errors in his post, including misidentifing me, it is still pretty neat to see it through someone else's eyes.

The only serious book about chainsaw milling was written in 1982 by a BC boy, Will Malloff. It's called Chainsaw Lumbermaking and is long out of print and hard to find. I did locate a copy at the library when I was first starting milling and I got some of my ideas from it. It was written more for milling your own softwood 2x4's if you are building a house or a deck, not so much for hardwoods for furniture. Bob would be the man to write the next book about the subject, and I hope he does so! There is a copy on line here, not sure how long it will be available though.

I am making progress on the small shelf of walnut for my neighbour. I have all the stock planed and the edges rounded. I have started putting some oil on a piece of scrap walnut just to see how it is going to come up. I have to say that after the first coat it is pretty amazing! The air dried walnut really has a ton of colours in it, far more lively than the kiln dried walnut I have used in the past. The only thing I can't figure out is why it still kind of brittle. I have experienced quite a bit of chipping along the cuts with it, especially the crosscuts.

 I had a hard time taking a picture of the test piece that properly showed how the oil popped the colours out on the left side of the scrap walnut. This one was the best of about 20 I took, but it still falls short.


This one has the shelf with a picture of its inspiration. I think I will make the "support" pieces a titch shorter.

It's looking more and more like I am going to lose my extra shop and storage space in the two car garage across the lane. The owner has been threatening for a while to sell his place, and recently he started talking about a timeline - this fall. The real estate market is pretty good here in town, so if he does sell I'll be scrambling to find space for a ton of wood, old powertools, and a 24" planer. Don't get excited and start emailing me, I am not planning on selling them!

It sure has been nice to be able to just walk across the lane to my overflow shop for the past couple years, I have gotten spoiled and will definitely miss the convenience.

As a final rant, when did it become so impossible to find robust quality 150 grit sheets of wet/dry sandpaper to use on the granite block for flattening stones? Recently all I have been able to find is this crap that falls apart after 2 minutes. Back in the day (like last year) the stuff would last for weeks of wet/dry cycles.  Local Borgs have nothing, Lee Valley only has 300+ grits, and sandpaper.ca wants a minimum $50 order.

Sunday, June 27, 2010

Odds and Ends

I have been focussing on clearing the table of a few small projects before I dive into the Hammond Glider resto.

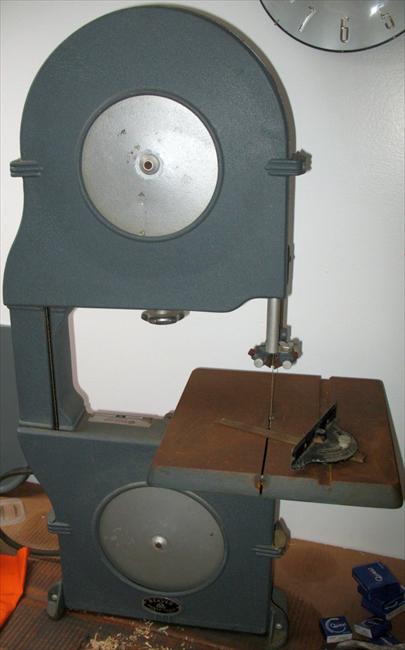
First up I was able to get the 12" Rockwell bandsaw project finished. The saw was in pretty good shape for its age, other than a bit of surface rust and a missing part, and the motor needed mounting. Here is the saw before:


A big push one full day got most of the resto work done. I took the bandsaw table and guide assemblies apart, cleaned everything, and put it all back together. I didn't bother replacing the bearings or the tires on it. I had to get a new upper thrust bearing assembly made at a local machine shop.

I cleaned the rust off the table by first scraping it off with a razor blade, brushing it with a brass wheel chucked in an electric drill, spraying it with wd40 and sanding it with 400 grit in an ROS, then cleaning and waxing with carnuba wax. Came up pretty nice I think.


The stand is of elm that I harvested, the mobile base is of purpleheart that I originally thought I would use on a cabinet, that didn't happen so now it's a mobile base. I made these up some months ago, they were not part of the one day resto!

Still need to fashion some kind of cover for the exposed end of the motor shaft, and to add a dust collection port to it. Someday.

Meanwhile I also went to a friend of a friend's place up the coast with my chainsaw mill, he had a 4 foot diameter yellow cedar butt that was 6' long. It was originally from Haida Gwaii, and had been quartered so it was easier to manage. We got about 25 nice slabs out of it, mostly quarter sawn with beautiful tight old growth grain. I brought home five gorgeous pieces about 2" thick.


Saturday, June 12, 2010

Bookcase Done!

Finally completed the 13 month long bookcase project.

Moved it upstairs into position in the living room. Something I had not anticipated was that it came up the basement stairs with only about an inch of clearance. Could have been a real disaster!


It was intended from the start to fit into a corner of our living room. Even though several of the panels had some sapwood on them, sapwood is quite invisible from most locations in the living room. I am pleased with the way I was able to hide it from view. I also made up half a dozen spare consoles, they are stored on a strip under the bottom shelf.

I made it as gift for my (very patient) wife, using elm I had harvested myself with my chainsaw mill. So I was prepared to accept the flaws in the wood as it had more significance to us.

The following shot shows more of the consoles in place. The only significant error I made in this project was when I drilled the holes for the consoles in the central frame piece on the back. I failed to drill them in the centre, they were offset by accident, so to compensate I had to drill matching holes equally offset in the other direction. That it why there are two consoles on the middle frame piece rather than one. 


And here it is in place with the shelves in, ready for books, family photos, and other treasures.


What is next? Well four people have contacted me with logs to mill on private property, so looks like the season is not quite over for that activity yet. Also I do have a small shelf project I started as a 'thank you' for a neighbour who gave me some walnut. I want to finish that one.

Then stand by for a major machine restoration, my Hammond Glider sliding table saw.

After that I will probably start another cabinet, I've been inspired for a long time by one I saw by Zivko Radenkov, a student of James Krenov's and a College of the Redwoods graduate. It's elm veneer with an inlay of dogwood flowers, called the Dogwood Cabinet. (Search for it on that page, it's near the bottom.) A beautiful piece, but one that may still be beyond my skills. Radenkov has a couple other cabinets on this same page that are even more stunning.

So I will continue to dream about that one, but probably go for something intermediate to that, a curved glass front cabinet comes to mind, I need to get away from doing rectangualr stuff!

Friday, May 28, 2010

Alien in the Shop!

I finally picked up one of these unbelievably cute 6" Craftsman planers. It was a machine I had wanted for a long time. I'd had a line on one in Massachusetts, but it fell through recently. This one I picked up locally, Tsawwassen. I guess I was destined to buy one from a place that is unpronounceable and unspellable!


For obvious reasons they are nicknamed 'aliens'. They are all cast iron and despite their diminutive size they pack some heft. I am hoping with minimal work it will be a nice precision planer for small stuff. 

Special thanks to Ryan for coming by and taking the Elm of Death slabs off my hands. My wife was happy to see them gone, not happy that he didn't take more! Get a bigger trailer Ryan!

Picked up a few rounds of locust from a nearby tree that got cut down. Locust is very hard, similar hardness to padouk, about the hardest wood that I am likely to find locally. Locust makes great jigs, bench dogs, etc. One of my first cabinets I made with locust I harvested, it has a strong yellow cast that has been darkening gently, and delicate ray flakes when quarter sawn.


Also made a touch of progress on the 12" Beaver bandsaw, in that I got the motor clamped to the stand and actually had it all running for a brief time. Long enough to discover that everything seems to work OK, but that the upper guide is missing the thrust bearing. Sigh.


Also made what for me is great progress on the bookcase. The Youtube drill and saw technique for making 7 mm diameter dowels was just not reproduceable enough, so I instead made a jig that allows me to feed a square stick into it with a drill, the jig holds it in position on my shaper which cuts it round as it spins past the shaper bit. It was quite tedious to set up those last couple 0.001" but it worked well once I got it dialed in.

After I made up several feet of 7mm dowel from various stock I turned my attention to the consoles themselves. A quick jig with a solid hold down on it, and working on two consoles per piece of wood solved the problem of consistent sawing of small pieces.


Each console has three vertical 'facets' on it, two of these are at the same angle, but the third is on a different angle. So, more work. The consoles are inspired by the consoles Craig put on his beautiful kwila sideboard at IP last year.


Once the consoles were trimmed, I drilled the backs for the dowels, modified the jig and cut the third face, planed each face and took off the sharp edges, cut each piece in half to separate the two consoles, and glued in and trimmed the dowels. Here is the first one.