Monday, January 18, 2016

Cherry Table Progress, etc.

Got the last of my home made planes dialed in. Well, almost dialed in! Still a tweak or two to go but happy with the progress.

Also did a big clean up and re-org of the garage where I store a lot of my slabs. It was so full that even though I had several slabs dried and just sitting in the kiln for several months, I could not unload them since there was absolutely no place to put them.

These are some really wide elm slabs that I was able to pull out of the kiln finally. I had milled them width wise rather than length wise, to preserve the width. The largest one is over 3' wide. Unfortunately they are all a bit ripply, something I have not seen before and I think is due to the way I milled them. Will probably have to cut them in half anyways, so the last time I will do that kind of cutting!

Finger jointed boxes are a fun way to spend a bit of time now and again, gives me a bit of a break with a simple project that yields quick results. Also a great way to use up small pieces of special wood.

Here is some maple burl I cut up and will use for the boxes.

The first box I made, out of a piece of figured myrtle my son and I picked up some years ago driving up the coast of Oregon/California. I discovered some errors on this one so just cut the fingers off and did it again.

These boxes are of French Olive. A local somehow got hold of me a few years ago and asked if they could have some arbutus for a woodworking friend in France. I gave them a couple pieces and in return they brought home a chunk of olive. It was pretty crack riddled, but I was able to cut some pieces out of it for these boxes. Also one box is from Garry oak a buddy gave me from Vancouver Island. 

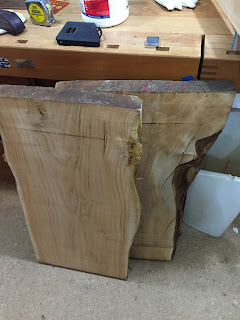
I wound up having to cut up another cherry slab for use in the base of the cherry table. I decided I wanted a couple of the pieces to be a bit larger than I was able to get from first few slabs I had cut up. I will be able to get a couple of nice 2x4" boards from these. And there is enough material that I can rip them to get rid of the grain run out, and they will wind up being mostly rift sawn so the grain will be similar on all four faces.
I will have to let these sit for a while to acclimatize before taking them down to final dimension.

Meanwhile I am ready to start on the crazy Japanese joint for the bottom piece.

Thursday, January 14, 2016

Easing Into 2016

Well I got one more of my planes dialed in. Still one last one to go for 2015 - I guess it is easy to get distracted here at the Slow Woodworker!

Still no milling to report. No logs showing up at the log dump. Talked to my contact at the city and he has no idea what is up.

No progress to report on the bentwood box either, other than to note that the crooked knife I have is apparently the wrong size. Later in 2016 for that project I guess.

Meanwhile I cut up several of my thicker cherry slabs to make pieces for the base of the cherry table I want to do.

Thanks to my Mini-Max bandsaw (one of the few modern tools I own) after not too much time the slabs looked like this.

In fact I had to cut up three slabs to get this many pieces, and I have one more slab for 'just in case'. Those cherry slabs have a lot of cracks coming in from the edges so there is a lot of waste. Good thing I know someone with a BBQ smoker who loves cherry wood scraps!

I want to make the base look something like this example that I found on the internet a few years ago. I have it filed under 'Clark', so thank you Mr or Ms Clark for the idea.

You can see the longest piece of the base is the one lying on the ground. It's almost as long as the top. Unfortunately my longest piece of thick cherry I want to use for the base is not long enough for the slabs I will be using for the top. What to do? Yes, that's right! Use a blind stubbed, housed, rabbetted, oblique scarf joint to join two pieces together to make a longer piece, how did you know that?

So I did a test using a couple pieces of slightly smaller cherry I had. Of course it did not go so well, it was too gappy, but at least I know what I did wrong so I should be good for the real one.

Anyway the start of the year seemed like a good time to head down a random rathole on another project. Finger jointed boxes it is! I was cruising the woodgears.ca site and admiring the crazy nice box joint fixture he made up and thought it would be a fun project. Then I realized I have a Hammond Glider sliding tablesaw that I have converted to Imperial units so I can precisely dial in increments of 1/256" or less than .004". Phht, who needs a box joint fixture when you have a tablesaw like that! And I have lots of small pieces of scrap that are perfect for small boxes.

I made up several small boxes, still working on getting the proportions to look good though. And as bonus I found this piece of scarp that looked like a fish skeleton on my table at one point!